Saturday, 20 October 2018

Tiramisu cupcakes


So... Last week I told you all about my go-to basic cupcake recipe. Today I'm going to introduce you to my tiramisu cupcakes, which basically means I'm adding a lot of amaretto and I'm using mascarpone in my frosting :-) And let's be honest, who doesn't love the delicious gooeyness of tiramisu? Sooooooo good!

Now, I came across a recipe (in Dutch) a few years ago (just click here to for the original recipe), and tweaked it to be more to my liking. And I must say I haven't heard any complaints yet, so I must have tweaked something right. 

Now... Let's begin... :-)

Tiramisu cupcakes


Ingredients:

For the cupcakes:
125 grams (4.5 oz) of self-rising flour
125 grams (4.5 oz) of sugar
125 grams (4.5 oz) of butter (at room temperature)
2 eggs (100 grams or 3.5 oz of egg)
2 table spoons of amaretto
2 table spoons of milk
½ table spoon of vanilla extract
For the topping:
300 grams of  mascarpone
100 grams of confectioner’s sugar
75 grams of whipping cream
1 table spoon of amaretto
Chocolate flakes or cocoa powder

Recipe:

So, let's get to work. For starters you just need to follow the recipe of my basic vanilla cupcakes. Just mix the flour, sugar, butter, eggs and vanilla extract until you have a smooth batter.  


Next, add the amaretto and stir it in until the batter is completely smooth again. lastly add the milk and stir until smooth. Easy, right?


This is where you start pre-heating your oven to 170°C or 340°F. Make sure you put the cupcake liners into the cupcake baking pan. I chose a colourful selection of pink, orange and purple just to brighten up the cupcakes even more. Just look how pretty it is...


Now, put the baking pan into the oven for 15 to 20 minutes. When the time is up, make sure to check whether the cupcakes are completely done by checking with a toothpick or a knitting needle. If it comes out clean, the cupcakes are done. Just take them out of the baking pan and put them on a rack to cool down.


This cooling down period gives you plenty of time to clean your baking pan and to start organising and making your mascarpone frosting. So get cleaning and take out your ingredients.


First things first, as you probably know, mascarpone is quite a thick substance, so it's quite important to loosen it up by using your mixer or whisk. 


Then add the confectioner's sugar to the mascarpone and beat with a mixer until you have a smooth and fluffy mixture. Next, add the whipping cream and beat for another few minutes until the mixture is fluffy again (if you take out a table spoonful of the mixture and tip it upside down, the mixture should stay on the spoon). Now, carefully stir in the amaretto and keep stirring until you again have that smooth and fluffy mixture.


It's time to take out your piping bag and start filling it with the mascarpone mixture. Then add a glorious amount of mascarpone cream on top of each cupcake (make sure the cupcakes have completely cooled before you do so. Otherwise the mascarpone cream would just melt and slide off).


Lastly you can finish off your cupcakes with some chocolate flakes or some cocoa powder on top of the frosting. I opted for the chocolate flakes, this time, but cocoa powder is also delicious, trust me...


All that's left to do now, is to devour these delicious treats, so... Enjoy!

Love, Ans xoxo


Sunday, 14 October 2018

Vanilla cupcakes with meringue buttercream

Soooo... Time for one of my favorite classics: vanilla cupcakes. And since every cupcake needs a topping, I decided to give meringue buttercream a try... or two... You might wonder why I'm starting with something as simple as a vanilla cupcake. Well, the reason is quite simple: once you've got the hang of the basic recipe, you can create pretty much any flavour in a cupcake. Awesome, right?


I came across these recipes a few years ago in a book written by De Koekjesfee. Ever since the first time I tried it, it has never failed me. Even altered versions of the recipe (tiramisu cupcakes, chocolate cupcakes, mojito cupcakes...) have always worked when I began from this basic recipe. So yes, I think it's important to start with the basics. Future cupcake recipes of mine will always start with this vanilla cupcake recipe as a basis.

So, how about we get started on those cupcakes?

Vanilla cupcakes

Ingredients:

125 grams (4.5 oz) of self-rising flour
125 grams (4.5 oz) of caster sugar
125 grams (4.5 oz) of butter (at room temperature)
2 eggs (about 100 grams or 3.5 oz)
2 table spoons of milk
1/2 table spoon of vanilla extract

Recipe:

First of all, like with all baking it is important to measure all of your ingredients. My mom really drilled that into me when I was a kid and she did all the baking. "Baking is a science," she would say, "One ingredient in the wrong amount can ruin the entire chemical make-up of what you're trying to bake." I've stuck with ingredient lists ever since ;-)


Now I like to start off with everything nicely in different bowls and all my measurement spoons in place, so I can't make any mistakes there. I know, I'm a freak, right? But mom would be so proud. :-)


The start of the recipe is quite simple. You just put all of the ingredients, except for the milk, in a bowl and start mixing. I used my usual handmixer for this, but if you prefer a Kitchenaid or the like, please feel free to use it. 


When your mixture looks something like this (doesn't take too long), you can add the milk and mix it into the batter. 


And this is the end result. Now is the time to put the cupcake liners into the cupcake baking pan. I found some red and white ones lying at the bottom of my baking drawer, so I decided I might as well use them ;-) 


Before you start filling those liners, make sure your oven is pre-heating at 170°C or 340°F (my oven pre-heats quite quickly, so I can wait up to this point to start pre-heating it). When you have done this, you can start filling the cupcake liners. I always use 2 table spoons to do the filling, but you could also use an ice cream scoop, or even a piping bag is you want to work really neatly (not really my style, to be honest). Make sure you don't fill the liners to the top. 2/3rds is enough, since the cupcakes still need to do some rising in the oven. 


When the oven has reached the right temperature, you can put the baking pan in the oven and leave it there for 15 to 20 minutes. Before you take them out of the oven, check whether they are baked though by using a tooth pick or, my mom's favourite, a knitting needle. 


Don't they look delicious when they come out of the oven? They smell it too... Just take them out of the baking pan and put them on a cool rack. They cupcakes need to be cool before you can start frosting them. Otherwise it will be one big melting party, and no one wants that.

Now, what I didn't tell you before, but you might have guessed from the picture with the ingredients, is that I actually made a double batch today. The recipe is enough for about 12 cupcakes, but I decided to show how easy it is to adapt the recipe and try something else. So.... I added some cocoa powder to make chocolate cupcakes, and some apple to make apple cupcakes. Easy, right?


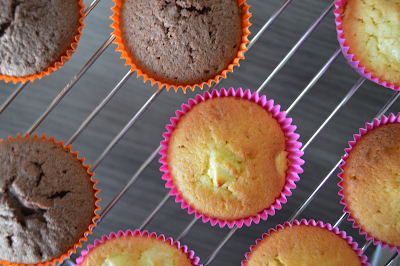
I chose some differently coloured liners (orange for the chocolate ones and pink for the apple cupcakes). Don't they look pretty together? The rest of the instructions are pretty much the same: oven for 15 to 20 minutes and done!


Now, of course, we still need to make the frosting: Merengue buttercream. This one was completely new to me. I had never tried it before and since it involved some actual cooking, I was worried I might need more than one try. And boy, was I right. Halfway through my au bain-marie mixing, I tipped my bowl a bit too fas and water ended up in my egg white mixture... Big sigh, some cursing... And then start all over again... Second time was the charm though, so no harm done ;-)

Let's begin...

Merengue Buttercream

Ingredients:

250 grams (9 oz) of egg whites
500 grams (1 lb 2 oz) of caster sugar
750 grams (1 lb 10.5 oz) of butter, diced in small pieces
A dash of salt

Recipe:
Again, start by weighing all the ingredients. Also make sure to pay attention when you're splitting the eggs. If there's any yolk in your egg whites, it will be much more difficult or even impossible to stiffen them. 

Now, take a cooking pot and partially fill it with water. Heat the water until it starts bubbling slightly, just before boiling point. Then, put your egg whites, sugar and dash of salt in a stainless steel bowl. Put the bowl au bain-marie over the pot of bubbling water. Now be careful not to make the same mistake I did and tip the bowl. Just keep it steady and whisk the egg whites and sugar until the sugar has melted completely. 

Bubbling water


Egg white and sugar mixture au bain-marie

When the sugar has completely dissolved, take the bowl out of the pot with water and transfer the mixture into another stainless steel bowl (of your Kitchenaid, for example). Then start whisking the mixture at medium speed until the egg white mixture is completely stiffened and the bowl feels cool(er) on the outside. 


Next, you take out the whisk and insert the flat beater. Put the speed again at medium speed and start putting the butter in bit by bit. Make sure the previous piece of butter is incorporated before you add the next (I tend to count to 10 between pieces). If the mixture seems to split or water seems to lie on top, don't worry. This happens sometimes. You just need to let the mixer or Kitchenaid to its work. 


When you've added all the butter, keep beating the mixture until everything is fully incorporated. Then speed up the Kitchenaid until you get a smooth mixture. Then the merengue buttercream is done and you can start frosting... Just put the buttercream in a piping bag and start your frosting...


After the frosting, this is the result...


Now get baking and enjoy your cupcakes...

Ans xoxo 


Saturday, 6 October 2018

No-Bake Chocolate Ganache Tart

The other day I was scrolling through Instagram and Pinterest and kept coming across all these beautiful pictures of cakes and desserts. All I kept thinking was: "Maybe I should try making this" and "That looks absolutely divine". So, I decided to look back to the summer and one of my favourite recipes for Luca's birthday: a no-bake chocolate ganache tart. Sounds delicious, doesn't it?


Just look at how happy he is with his birthday cake... Or maybe it was just the idea of getting to blow another candle :-) Anyway, everyone loooooved the tart and, even better, it is super easy to make. Just try it. Now I got the original recipe (in Dutch) from this website (https://www.leukerecepten.nl/recepten/chocoladetaart-met-aardbeien-zonder-oven/). I just tweaked it to be more to my liking :-)

So here goes...

First things first, the easiest way of making the tart is in a baking pan with a removable bottom, For this blogpost I decided to make the miniature version in a earthenware pan, which is also possible, it's just a bit trickier to remove the cake from the pan without the bottom and sides crumbling in your hands...

I bought these pretty little pans at Maisons du Monde in early summer and have been waiting for the perfect opportunity to use them :-) And I must say they worked perfectly.

Now, let's start making the chocolate ganache tart (don't worry, I've included the concise version of the recipe in English and Dutch at the bottom of this post). 

No-Bake Chocolate Ganache Tart

Ingredients:
  • 250 grams (or 9 oz) of petit beurre cookies (Graham crackers works as well)
  • 100 grams (or 3.5 oz) of melted butter
  • 300 grams (or 10.5 oz) of dark chocolate
  • 200 ml (or a little under 0,5 pt) of double cream
  • Assortment of berries (strawberries, blueberries, raspberries, blackberries) for decorating

Recipe:

We're starting with the preparations, so take your baking pan (with removable bottom) and line it with parchment paper. Make sure the bottom and sides are well-lined so it will be easy afterwards  to remove the tart from the pan.


Now let's start cooking! Take your petit beurre cookies or Graham crackers and put them in a blender. Blitz the cookies or crackers until it looks like course sand. Then put the blitzed cookies in a bowl and put it to the side. Now, melt the butter, making sure you keep an eye on the melting butter, so you don't burn it. 


Next, add the melted butter to the blitzed cookies. I always choose to pour all the butter in at once and then start stirring, but you can add it gradually as well. Just keep stirring that cookie and butter mixture until it resembles wet sand.


Since our cookie and butter mixture is finished now, we can put it in our lined baking pans. Just spread out the mixture on the bottom of the pan first and pat it down firmly and evenly with a spoon. Also make sure to create a cookie edge as well by patting down the cookie mixture on the sides. This always takes a bit longer for me because I keep trying to pat down more cookie mixture to create good, firm sides. The problem is that by doing so I always tear down parts of the sides I've already made... So try to keep your perfectionist side at bay :-)


When you have put the cookie mixture in the baking pan and you have patted it down on the bottom and the sides, you put the baking pan in the fridge for at least 1 hour. 

Time for a little break. I usually take this time to start cleaning the mess I've already made and then put on a load of laundry or read a magazine or a chapter in a book. Relaxing is important too, after all :-)

When you're nearing the end of the hour, you can start on the next stage of the tart: the easiest chocolate ganache you will ever make. All you need is dark chocolate and double cream. That's it. 

So take your double cream, pour it in a saucepan and start heating it. The double cream doesn't need to boil (it can, but it is not necessary), it just needs to be warm enough to melt the chocolate. When heating the double cream, make sure it doesn't burn or boil over. 

Next break the chocolate in pieces and put it in a bowl. When the double cream is warm enough, pour it over the chocolate and start stirring. You need to stir the chocolate and cream until all the chocolate has melted and you have a shiny, gooey chocolate mixture. This is your chocolate ganache. Easy, right?

I am Belgian, so I'm used to really delicious chocolate. My favourite is Côte d'Or, so rich and full of flavour... Yum yum :-)


When your chocolate ganache is ready, you take the baking pan with the cookie base out of the fridge. Just pour the ganache over the cookie bottom until almost at the top of the sides. Don't pour it over or you might end up with a chocolate, gooey mess. When the ganache is in the baking pan, put the pan back in the fridge to set for about 3 hours. 


Another break for you to do your housekeeping, run some errands... Or you could even make the tart up to this point the day before and then leave it in the fridge overnight. 

When the three hours are up, you can start prepping the berries and decorating the tart to your liking. Before you start putting berries on top of your tart, make sure you carefully take it out of the baking pan, remove the parchment paper and put it on the plate on which you want to serve it. Don't worry if your tart is crumbling slightly, this is perfectly normal. Then you just start putting the berries on the tart until it looks the way you want it to. When the tart is finishe, you can keep it in the fridge for up to 3 days. 


Now, stop your fidgeting and moving berries around and surprise your family and friends with this beautiful and delicious chocolate ganache tart. 

Enjoy!

Love, Ans xoxo

P.S.: You can find the concise version of the recipe right here. Enjoy!